
Chocolate Zucchini Muffins
Makes 24 regular sized muffins or 48 mini muffins
These are a yummy treat for breakfast or a snack. You could even frost these and pass them off as cupcakes! That is how good they are! This recipe was originally not as healthy, but once I lowered the sugar, and replaced some of the oil with applesauce, it makes it a healthier chocolate snack. The recipe makes a double batch, so you'll have plenty to share. I've even made this with 2 1/2 cups of shredded zucchini and it still comes out great! ~ Carissa
3 eggs
½ cup canola oil
½ cup applesauce
1 1/2 cups sugar
1 tablespoon vanilla
2 zucchini unpeeled and finely shredded (about 2 cups total)
2 ½ cups all-purpose flour
½ cup baking cocoa
3/4 teaspoon salt
1 teaspoon baking soda
½ teaspoon baking powder
1 teaspoon ground cinnamon
1. Whisk together the eggs, oil, sugar, applesauce and vanilla in a mixing bowl. Then stir in the zucchini.
2. In a separate bowl mix the dry ingredients together, then add to the wet mixture. Don’t over mix, but make sure the two mixtures are evenly combined.
3. Pour into greased muffin pans and bake at 365 degrees.
4. Bake the regular sized muffins for 15-16 minutes and the mini muffins for 11-12 minutes. As soon as they are cool enough to handle, pop them out of the pan and let them finish cooling on a cooling rack.
*************************************
Perfect Roasted Carrots

These are super sweet and keep you eating more of your veggies.
Serves 4-6(depending on how much you love carrots)
12 carrots, cut into 1 1/2 inch pieces
2 1/2 tablespoons olive oil
1 teaspoon coarse kosher salt (3/4 teaspoon if using table salt)
1/2 teaspoon black pepper
1 teaspoon dried dill
1. Preheat oven to 400 degrees
2. Toss the carrots in a bowl with the olive oil, salt, pepper and dried dill. Place on a rimmed baking sheet lined with foil or parchment paper for easy clean up. Spread them out in a single layer for even roasting.
3. Roast for 20-25 minutes depending on the thickness of your carrots. Half way through give them a little stir to brown all sides of the carrots. You want the edges to caramelize and even get slightly charred. Enjoy! For even more flavor try skipping the dry dill and tossing them with chopped fresh dill after they come out of the oven!
********************************
Whole Wheat Belgian Waffles

These waffles are a healthy treat in the morning! The cinnamon adds that special something that makes you say..."hmm, what is that?"
2 cups whole wheat flour
1/4 cup white sugar
3 tablespoons baking powder
3/4 teaspoon salt
1/4 - 1/2 teaspoon ground cinnamon (depending on how cinnamony you want them)
2 cups milk
3 eggs, beaten
1/3 cup vegetable oil
1 teaspoon vanilla extract
1. Stir together the flour, sugar, baking powder, salt, and cinnamon in a large bowl, then set aside.
2. In a separate bowl mix the milk, eggs, and oil, then combine with the dry ingredients until smooth.
3. Preheat your waffle iron, and spray with a little non-stick cooking spray. Pour about 1/3 cup of batter into the waffle iron. Follow directions that came with your waffle iron for cooking times. Enjoy!
*******************************************

Spicy Tilapia
This is a super fast way to get some flavorful food on the table. I buy a 4 pound box of individually wrapped tilapia fillets at Wal-Mart in the freezer section. They thaw out in 10 minutes, and are ready to bake. You can’t beat that for last minute dinner plans! --Carissa
1 tablespoon melted butter
2 tablespoons lemon juice
4 Tilapia fillets
Seasoning Mix:
1 teaspoon dried oregano
2 teaspoons chili powder
1/8-¼ teaspoon ground cayenne pepper (depending on the heat you want)
½ teaspoon salt
1. Mix the melted butter and lemon juice together in a shallow bowl. Dip both sides of each fillet in the wet mixture, then place on a baking sheet.
2. Mix the seasoning mix together and sprinkle evenly on top of tilapia fillets.
3. Bake uncovered at 450 degrees for 10 minutes.
**************************************************
Easy Polenta


Easy Polenta
This is such an easy sidedish to almost any meal, and cheap too! It tastes like really creamy grits.
My kids gobbled this up, asking for more! This is a lower fat version of Giada De Laurentiis's polenta.
If you have leftovers, save it in the fridge for fried polenta the next day! Just slice it up and saute'. --Carissa
6 cups water
2 teaspoons salt
1 3/4 cup yellow cornmeal
2 Tablespoons butter
1. In a large saucepan boil the water and salt,
then gradually stir in the cornmeal whisking constantly to avoid lumps.
2. Turn the heat to low and cook for about 15 minutes stirring often.
3. Turn off the heat and stir in the butter.
**********************************

Applesauce Granita
This is a very cool and refreshing summer treat! I know you are probably wondering...doesn't it just taste like frozen applesauce though? Well, technically yes, but it has a slushy consistancy, and is low in sugar, and healthy for you! What could be better to give the kiddos on a hot summer day? Much better than handing them one of those frozen sugar filled pops. --Carissa
2 cups unsweetened applesauce
1 tablespoon lemon juice
1. In an 8 inch square pan, stir the applesauce and the lemon juice together. Spread the mixture flat in the bottom of the pan.
2 Freeze the pan for about an hour, then take out from freezer and stir it with a fork. Return to the freezer for another 45 minutes.
3. Scrape all the frozen mixture and "fluff" it up again. It is ready to serve, just freeze the leftovers for the next hot day! It will harden quite a bit in the freezer, so let it sit out at room temp for a few minutes to soften enough to scoop.
makes 2-4 servings...depending on how big your servings and your people are.
********************************************
Cream of Poblano Soup

I found this recipe in the newspaper. I was quite fascinated with the idea of processing corn tortillas as the foundation for the soup. I lowered the fat content (like I usually do!) and changed a few other things to my liking. I feel like an Indian woman on the mesa cooking this soup—it has an inviting earthy aroma with the corn tortillas. I like to use a frozen corn tortilla, called Ezekiel tortillas that I get from the health food store. If you can locate this brand, they really intensify the flavor of this filling and delicious soup. Oh, and if you want a light, simple soup, just leave out the chicken and it makes a good accompaniment soup. ~Janice
Cream of Poblano Soup
Makes 5 to 6 servings
6 corn tortillas
4 tablespoons all-purpose flour
1 teaspoon chili powder
2 teaspoon cumin
1 teaspoon fresh ground black pepper
1 medium onion
1 larger poblano pepper
3 cloves garlic, minced
4 tablespoons olive oil
2 tablespoons butter
6 cups chicken stock
1 cup half-and-half
1 cup shredded Rotisserie chicken
Monterey Jack cheese, shredded for topping


Take a look at what a big poblano pepper looks like. I like to use 2 kinds of tortillas: stone ground (frozen)Ezekiel tortillas from the health food store (for their intense corn flavor), and half regular corn tortillas.


It is kind of cool how the tortillas grind up like cornmeal


Don't worry, the poblano pepper is not hot--more like a spicy version of the green bell pepper.

Skip the addition of chicken, and you have a simple accompaniment soup for the Spicy Hot Turkey Wrap on page 74.
Tear corn tortillas into pieces and place in a food processor and process until fine. Add flour, chili powder, cumin, pepper, and blend until of cornmeal consistency. Set aside in a bowl.
Cut onion and poblano pepper into large chunks and add to food processor and process until fine.
Put oil into a stockpot on medium high heat. Add onion and pepper mixture and sauté until onions are clear. Add garlic and cook one minute. Drop in butter and let melt. Pour tortilla mixture into pot and cook and stir for 1 to 2 minutes.
Slowly add stock and bring to a simmer for 10 minutes. Add half-and-half and chicken. Slow simmer for 20 minutes. Do not let soup come to a hard boil. Taste for additional salt.
To serve, top each serving with cheese.
**********************************************************

This cornbread recipe comes from the cookbook, The Pioneer Woman Cooks. I modified the amount of oil she called for, and I streamlined the preparation. This cornbread has such a tender crumb because of all the buttermilk and milk in it. It is a soft cornbread, not sweet, but with a delicate texture. I don’t think this will hold up well as a muffin, or to add cheese to, like our cornbread recipe on page 283. But there are times that this tender, soft cornbread is just right for the occasion. I especially like this version after a meal, with molasses poured on top and eaten like dessert (that’s the way old-fashioned people eat it). ~Janice
Tender, Buttermilk Cornbread
1 cup yellow cornmeal
½ cup all-purpose flour
1 teaspoon salt
1 tablespoon baking powder
½ teaspoon soda
1 cup buttermilk
½ cup milk
1 egg
¼ cup cooking oil, divided
1. Preheat oven to 425 degrees. Spray with non-stick cooking spray (your choice) an oven-proof skillet, 10-inch pie pan, stoneware dish, or 9 x 9-inch glass dish for cornbread. (I have a stoneware pie dish I like to use—but any of these choices will work fine.)
2. In a medium bowl, whisk together cornmeal, flour, salt, baking powder, and soda. In a large measuring cup whisk together the buttermilk, milk, and egg.

3. Measure out the ¼ cup oil, then pour about 1 tablespoon of the oil into your baking dish, enough to cover bottom of dish. Put the dish with the oil into the oven to preheat.
4. Meanwhile, whisk the remaining oil into the wet ingredients. Wait for pan in the oven to heat, then mix the wet ingredients into the dry, whisking just enough to mix. Remove dish with hot oil from the oven, and quickly pour cornbread mixture onto the hot oil. The batter should sizzle.

5. Return dish with cornbread mixture in it to the oven and bake for 15 to 20 minutes, till lightly golden.
*********************************
Swedish Oven Pancake ~ Ugnspannkaka
Makes 4 servings
David's father's twin sister, Aunt Judie,(a full-fledge Swede) gave us this recipe years ago. It is a favorite of mine for 3 reasons: It taste wonderful--like a cross between a crepe and a soufflé; it is extremely easy to make, and can be mixed up in advance; and it is a pretty healthy breakfast for something that is sweet. This is perfect for breakfast company, or even for a late evening supper. ~Janice

2 cups milk (or 1 cup canned milk and 1 cup water)
1 cup flour (you may substitute 1/4 cup whole wheat flour if you desire)
2 tablespoons sugar
1/2 teaspoon salt
2 tablespoons melted butter, cooled
1 teaspoon vanilla
1 tablespoon butter to melt in pan
Optional: sprinkling of powdered sugar.
- In a blender, add all ingredients except final tablespoon butter. Blend well, then let sit for about 20 minutes, or cover and refrigerate untill ready to bake, up to 2 to 3 days.
- Preheat oven to 425 degrees. Spray a 9 X 13-inch baking dish with cooking spray. Melt butter in prepared dish in the oven, just till melted, but not browned.
- Stir batter, then pour into pan over the melted butter. Bake for 20 minutes until golden brown. Pancake will puff up into high mounds that quickly fall after removing pan from oven.
- Cut into squares and serve with fruit-flavored syrup and berries, or simply with maple syrup. If you like, sprinkle each serving with powdered sugar.

Put your liquids in the blender first, then the dry ingredients on top...

If you don't have a blender, you can just use a hand held mixer to blend ingredients.

It doesn't look like much at first...
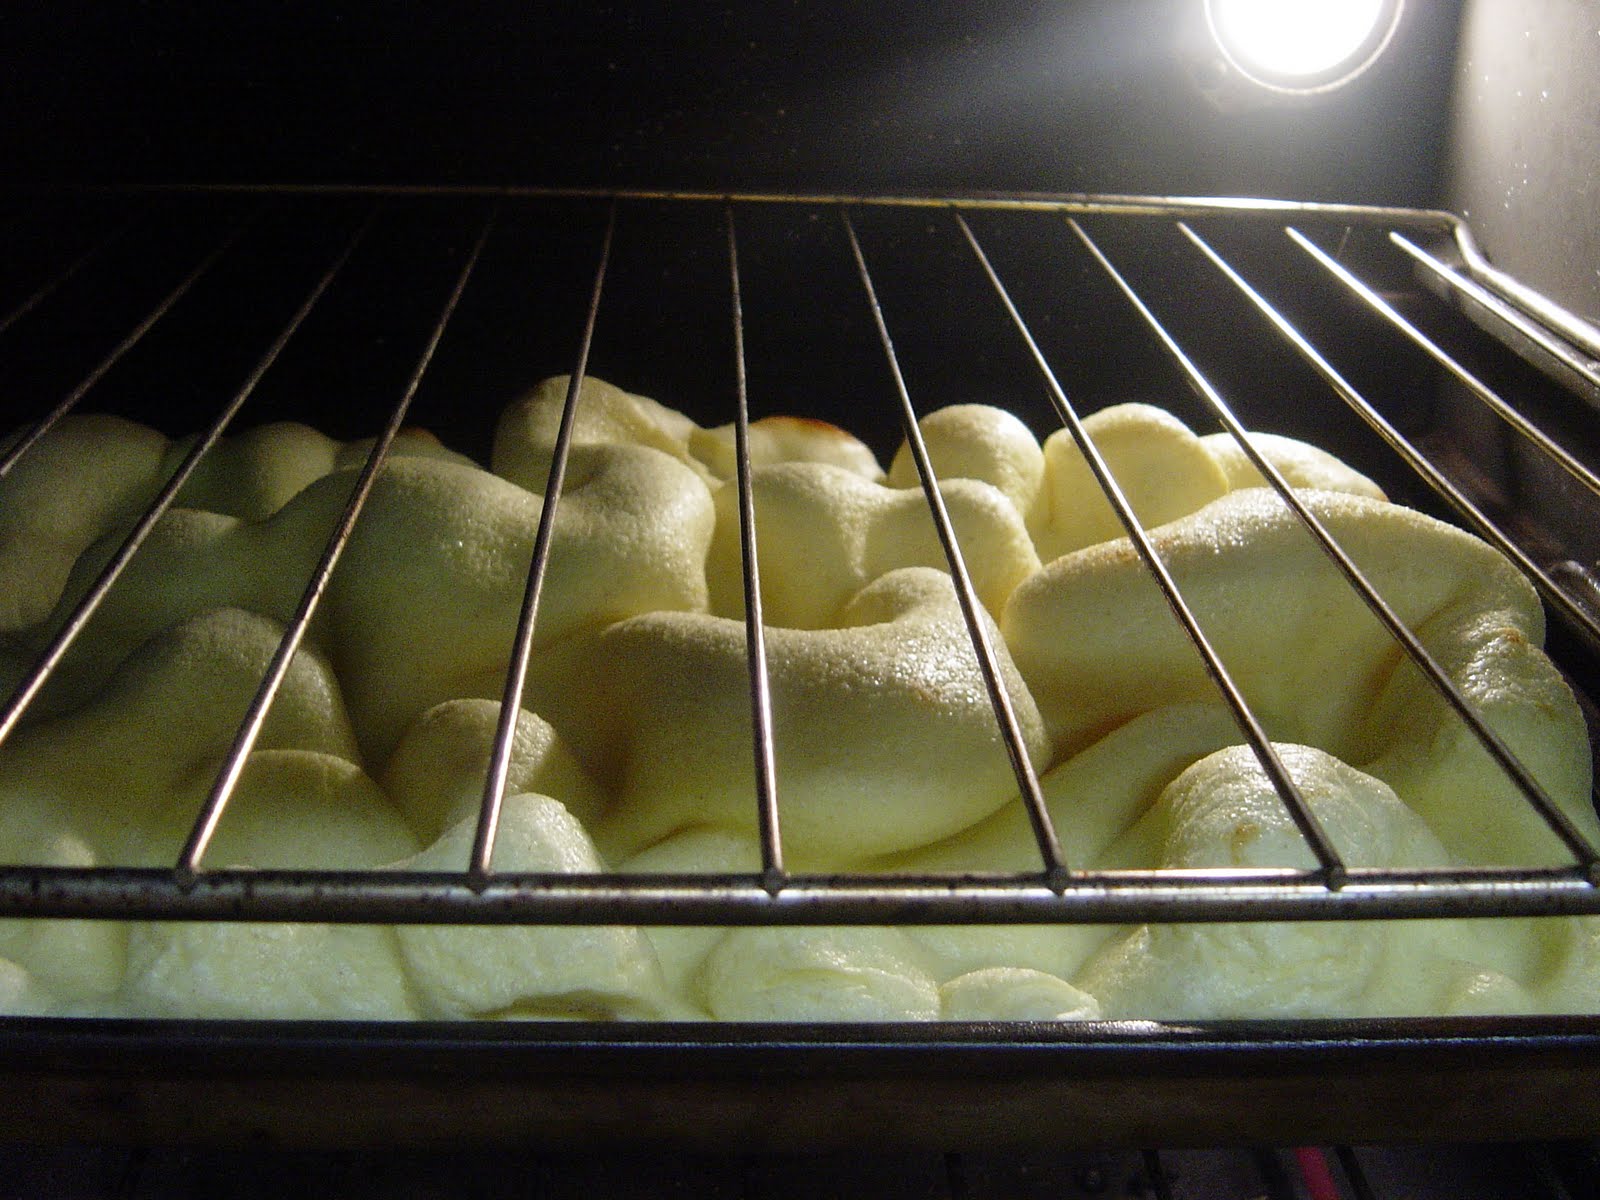
But look what starts to happen very quickly in the oven!

Golden brown and beautifully puffy! (By the way, I made 2 of these this week, and this one I made in a stoneware pan instead of the glass baking dish you see below.)

And then it all falls down.

You are going to love this for breakfast!
NOTE: Leftover oven pancake heats up almost as good as new. Just put remaining (refrigerated) piece in a 400 degree oven for 5 to 8 minute until it feels hot to the touch, and serve up the leftovers for another great breakfast. Also, here is a tip for my favorite (somewhat healthy) syrup--mix equal amounts of real maple syrup (I buy the cheapest one at Walmart) and Agave Nectar (similar to honey, but a lighter taste, and a lower glycemic index, so better for you.) Heat up slightly in microwave and serve. I like this because it is less expensive than pure maple syrup, and has a milder taste. Here is a picture of my mix:

*******************************************************************
Grilled Garlic & Rosemary Flank Steak
I made this when Adam's parents came in town recently. I was experimenting on them....they loved it! Adam said it was the best thing I had ever made for him! I can hardly think of a better compliment. So, give it a try and tell me what you think. I served it with the chimichurri sauce from our cookbook and it was heavenly --Carissa

1 flank steak
1 ½ teaspoons coarse kosher salt
2 tablespoons chopped fresh rosemary
6 cloves fresh garlic minced
¼ cup minced onion
6 tablespoons olive oil
1. Lay the steak out in a casserole dish, and then poke with a fork about 25 times on each side. Divide up the salt and sprinkle ¾ teaspoon on each side, rubbing it in.
2. In a blender make a paste out of the rosemary, garlic, onion, and oil. Rub this paste on both sides of the steak. Cover with plastic wrap and chill in the fridge for 2 hours or up to 8 hours.
3. Remove meat from the fridge 30 minutes before grilling to allow meat to warm up for even grilling. Heat grill to medium high heat.
4. Wipe off as much marinade as you can with paper towels. Grill for 5-6 minutes on the first side, then 5-6 minutes on the second side. Cut into the middle to check doneness. It will continue cooking after you remove it. You want it to be pink inside. Remove from the grill cover with foil and allow to rest for 10 minutes.
5. Slice very thinly at an angle across the grain and enjoy!
Makes 4 servings
*******************************************************************

I revised a recipe today that I think will make it into our next cookbook! The recipe was inspired by Ina Garten’s Banana Crunch Muffins. I have always thought Ina’s recipe sounded good—but it is too high in fat and sugar for me to feel good about making it. There is something on the inside of me that wants to change up every recipe I see to make it just a wee bit healthier! So here is my version of these truly wonderful muffins. ~Janice
Banana-Coconut Crunch Muffins

2 cups all-purpose flour
1 cup whole wheat flour1 ¼ cups white sugar
2 teaspoons baking powder
1 teaspoon baking soda
½ teaspoon salt
¾ cup (1 ½ sticks) butter, melted and cooled
2 eggs
¾ cup milk
2 teaspoons vanilla extract
1 cup mashed ripe bananas (2 bananas)
1 cup medium-diced ripe bananas (2 bananas)
1 cup small diced walnuts or pecans
1 cup sweetened shredded coconut (reserve ¼ cup for topping)
1 cup crunchy granola
2 tablespoons brown sugar, optional (depending on how sweet your granola is)
1. Preheat oven to 350 degrees. Spray 18 muffin cups with non-stick cooking spray
2. In a large bowl, whisk together dry ingredients. Whisk in melted butter. Keep whisking until mixture is combined and looks similar in texture to brown sugar. This will take a minute or two.
3. In a separate bowl, stir together eggs, milk, and mashed bananas.
4. Stir chopped bananas, nuts, and 3/4 cup shredded coconut into dry mixture. Slowly combine dry mixture with wet mixture. Stir just until combined. Do not over-mix.
5. Scoop batter into muffin cups. In a separate dish mix reserved ¼ cup coconut with the granola and the brown sugar. Sprinkle this topping mixture on top of unbaked muffins. Press topping lightly with your fingers to secure the granola mixture.
6. Bake muffins 15 to 20 minutes or until tops are brown and a toothpick comes out clean. Cool slightly; remove from pans to cooking rack.
Makes 18 muffinsNOTE: You may worry that 18 muffins are too many to make at one time, but it worked out fine for me, even with just my husband and myself. We ate 4 muffins for breakfast, I froze 6 muffins, saved 4 more for breakfast tomorrow, and packed up 4 muffins to give away to a friend I knew was dropping by later in the day. Muffins are like a good-morning hug!
*******************************************************************
Olive Oil Granola with Fruit and Nuts

4 cups old-fashioned rolled oats, or a blend of
different kinds of flakes, like wheat, rye, etc.
1/2 cup pure maple syrup
1/4 cup honey
1/2 cup extra virgin olive oil
1 teaspoon kosher salt
1/2 teaspoon ground cinnamon
1/2 teaspoon ground cardamom
1 1/2 cups pecans, walnuts, cashews, pistachios,
almonds or a blend of any of these nuts
1 cup raw pumpkin seeds, hulled
1 cup raw sunflower seeds, hulled
1 cup flaked coconut
1/4 cup chopped dates
Bear Naked granola, almond cinnamon flavor
1. Preheat oven to 275 degrees. In a a large bowl, combine oats, maple syrup, honey, olive oil, salt, cinnamon, and cardamom. Set aside a little of this mixture to mix with pecans (if you are using them) and coconut. (You will stir in the pecans and coconut for the last 10-15 minutes of the cooking time, so that the pecans and coconut don't brown too much.) Spread mixture on a rimmed baking sheet in an even layer and bake for 30-50 minutes, stirring every 10 minutes.
2. Remove pan from oven and stir in whatever nuts and seeds you want to use, and the coconut. Put pan back in the oven and bake another 30 to 40 minutes, again stirring every 10 minutes, until the mixture is golden brown and well toasted. However, do be careful not to over-toast. The mixture will crisp up as it cools.
3. Transfer granola to a large bowl and add all the dates. Allow the mixture to cool completely for a couple hours, then mix in the box of store bought granola, and store your finished granola in an airtight container.
*******************************************************************
*******************************************************************
Homemade (chemical free!) Hot Cocoa Mix
 For years I have looked for a homemade hot cocoa mix to improve on the overly-sweet, chemical laden hot chocolate mix packets offered in the grocery store. But all the recipes I found used some sort of coffee creamer product--full of palm oil and yucky stuff. But finally I came across a recipe that skips the dry coffee creamer, and gets its thick creaminess from white chocolate instead. The recipe called for white chocolate chips, however, I vetoed that idea, as it puts you be back into the palm oil and such stuff. I found that the Baker's white chocolate baking squares are the healthier choice of white chocolate. If you can find dark Dutch-processed cocoa powder, it makes the richest chocolate, but that can usually only be found in specialty supermarkets or on the internet (where I get mine); so if you have to substitute, you can. This instant hot cocoa mix can be added to hot water, but I prefer hot milk. A warm cup of this mix is creamy, rich, and big on chocolate flavor. ~Janice
3 cups nonfat dry milk
2 cups confectioners' sugar
1 1/2 cups Dutch-processed cocoa powder
10 ounces white chocolate baking squares, roughly chopped 1/4 teaspoon salt

1. Combine ingredients in large bowl. Working in two
batches, pulse ingredients in food processor until chocolate is finely ground.
Store in airtight container for up to 3 months.


 2. To make hot cocoa: stir ¼ to 1/3 cup of mix into 1 cup of hot milk. For a mocha latte: stir 1/3 cup mix into a blend of 1/2 cup hot milk and 1/2 cup hot coffee. Stir vigorously with a small whisk to froth slightly.
 NOTE: I like to put my cup of milk with the cocoa mix back into the microwave for an additional 30 seconds just to make sure all the white chocolate gets melted and creamy.
*This recipe may be halved.


3 cups nonfat dry milk
2 cups confectioners' sugar
1 1/2 cups Dutch-processed cocoa powder
10 ounces white chocolate baking squares, roughly chopped 1/4 teaspoon salt

1. Combine ingredients in large bowl. Working in two
batches, pulse ingredients in food processor until chocolate is finely ground.
Store in airtight container for up to 3 months.


*This recipe may be halved.


No comments:
Post a Comment